Authentication and Authorization
-
Get an Access Token
2.1 cURL example
2.2 Postman example
2.3 .NET c# example
2.4 Node.js example -
Customer code and Visitor code into Access Token
4.1 cURL example
4.2 .NET c# example
4.3 Node.js example
1. Authentication and Authorization
The Zakeke REST API uses the OAuth 2.0 protocol to authorize calls. OAuth is an open standard that many companies use to provide secure access to protected resources.
To have permission to execute an api call you must first contact an authentication server and obtain an authorization token (also called access token) and then use the authorization token in all the subsequent api calls. So to make a sequence of API calls you have to follow the following steps:
- get an access token (authentication)
- use the access token to make the first API call (authorized)
- use the access token to call the second API call (authorized)
- use the access token to call the third API cal (authorized)
- ...
Upon account creation, Zakeke automatically generates the necessary API keys required for the authentication and to get an access token. Users have the flexibility to create new API keys at any time, which can be done by accessing the dedicated section in the Zakeke back-office as better explained in the get Access Token section. This functionality also allows for the disabling of previous keys, thereby ensuring enhanced security and control over access to the user's account data.
In Zakeke, an API Key is a set of OAuth client ID and secret credentials for your Merchant Web Site for live environment. In order to authorize your subsequent API calls, you have to pass these credentials in the Authorization header in a POST Access Token request (or alternatively directly in the body of the request).
In exchange for these credentials, the Zakeke authorization server issues access tokens called bearer tokens that you use for authorization when you make REST API requests. A bearer token enables you to complete actions on behalf of, and with the approval of, the resource owner.
The Access-Token field in the get access token response contains a bearer token, indicated by the token_type of Bearer:
{
    "access-token": "Your-Access-Token",
    "token_type": "Bearer",
    "expires_in": 32398
}
Include this bearer token in all subsequent requests in the Authorization header with the Bearer authentication scheme.
This sample request uses a bearer token to get a specific design created by a customer:
curl -v -X GET https:/api.zakeke.com/v1/designs/000-2p5ysDc6d0mC6FQXL0BHXA \
     -H "Content-Type:application/json" \
     -H "Authorization: Bearer <Access-Token>"
Access tokens have a finite lifetime. The expires_in field in the get Access Token response indicates the lifetime, in seconds, of the access token. For example, an expiry value of 3600 indicates that the access token expires in one hour from the time the response was generated.
To detect when an access token expires, write code to either:
-
Keep track of the expires_in value in the token response. The value is expressed in seconds.
-
Handle the HTTP 401 Unauthorized status code. The API endpoint issues this status code when it detects an expired token.
Before you create another token, re-use the access token until it expires.
Important: For security reasons, authentication tokens should be generated fresh for each session or API call sequence rather than being stored for extended periods. While tokens can be reused until expiration for performance optimization, avoid long-term storage of tokens in databases, configuration files, or client-side storage. Always generate tokens on-demand when needed to minimize security risks.
2. Get an Access Token
To obtain an access token use the following endpoint:
POST https://api.zakeke.com/token
The POST call requires some parameters to be passed, including OAuth credentials (API keys). "x-www-form-urlencoded" is the protocol that was chosen for passing the parameters to the POST request.
The "x-www-form-urlencoded" format is used to encode and transmit data as part of an HTTP request, typically during a POST method. This format serializes data into a string of key-value pairs, where each pair is separated by an ampersand (&), and keys are separated from values by equals signs (=). Before serialization, keys and values are percent-encoded to ensure compatibility with URL standards, converting spaces to + or %20 and special characters to % followed by their ASCII hexadecimal code.
Setting the "Content-Type" header to "application/x-www-form-urlencoded" in the HTTP request is crucial, as it signals the server to parse the incoming request body according to this encoding scheme.
The following are the parameters that Zakeke requires to obtain an authorization token:
| Parameter | Description |
|---|---|
| grant_type | Mandated by the OAuth 2.0 protocol to specify the authorization flow, must be set to "client_credentials", indicating the client is authenticating directly with its own ID and secret to obtain an access token without user involvement. |
| client_id | A unique identifier assigned by Zakeke to the merchant upon registration. It is used to identify the merchant in the OAuth 2.0 authorization process. |
| client_secret | A secret key provided by Zakeke to the merchant upon registration. It is used in conjunction with the client_id to authenticate the merchant to the authorization server. |
| access_type | Indicates whether the token can be used client-side or server-side. It can take the values "C2S" (which stands for client to server) or "S2S" (which stands for server to server). By default the value is "C2S". |
| visitorcode | To be used only when a resource can be associated with the current ecommerce site visitor. Read the explanation section. |
| customercode | To be used only when a resource can be associated with the current user who logged in to the e-commerce site. Read the explanation section. |
Zakeke supports the OAuth 2.0 standard and, as required by that standard, the "client_id" and "client_secret" can alternatively and preferably be submitted using the "Authorization" header with Basic authentication. In this method, the client_id and client_secret are concatenated with a colon (:), base64-encoded, and prepended with the keyword Basic. This string is then included in the request's "Authorization" header.
Security Best Practice: It is strongly recommended to use HTTP Basic Authentication for transmitting client_id and client_secret when making OAuth 2.0 Client Credentials grant requests. This method involves encoding the credentials in Base64 and sending them in the Authorization header, providing a higher level of security compared to including them directly in the request body with application/x-www-form-urlencoded. Direct inclusion in the request body should be avoided unless absolutely necessary and only in secure contexts.
In response, the Zakeke authorization server issues an access token in a JSON object with the following structure:
{
    "access-token": "Your-Access-Token",
    "token_type": "Bearer",
    "expires_in": 32398
}
Re-use the access token until it expires. When it expires, you can get a new token.
Important: The API call for obtaining an OAuth 2.0 token using Client Credentials should be performed strictly in server-to-server contexts. This approach ensures that client_id and client_secret are not exposed to clients or transmitted over less secure channels. Implementing this call from client-side applications or exposing sensitive credentials to the public can lead to serious security vulnerabilities. Always ensure that such API calls and the handling of credentials are securely managed within server-side environments.
The authorization token obtained is by default of type C2S, indicating that it can be used for client-to-server calls. This type of token is usually used for API calls involving the Zakeke UI integration process. Where specified, Zakeke APIs may request a token created specifically for server to server use. In this case, the POST call to obtain the token must specify the type of use. See the appropriate section for all the details.
Use C2S (Client-to-Server) tokens when integrating the Zakeke UI components on the frontend, specifically:
- Visual Product Customizer: for product personalization interfaces
- 3D Product Configurator: for 3D product configuration interfaces
These tokens are designed to be used in client-side code (browser) to communicate with Zakeke services. The C2S token should be generated server-side and then passed to the frontend for use in the Zakeke integration.
To begin using using Zakeke API, follow these steps:
- First, create an account on the Zakeke website.
- Get your Zakeke API keys by going to Your Account and click on API keys tab section.

- Go to Sales Channels.
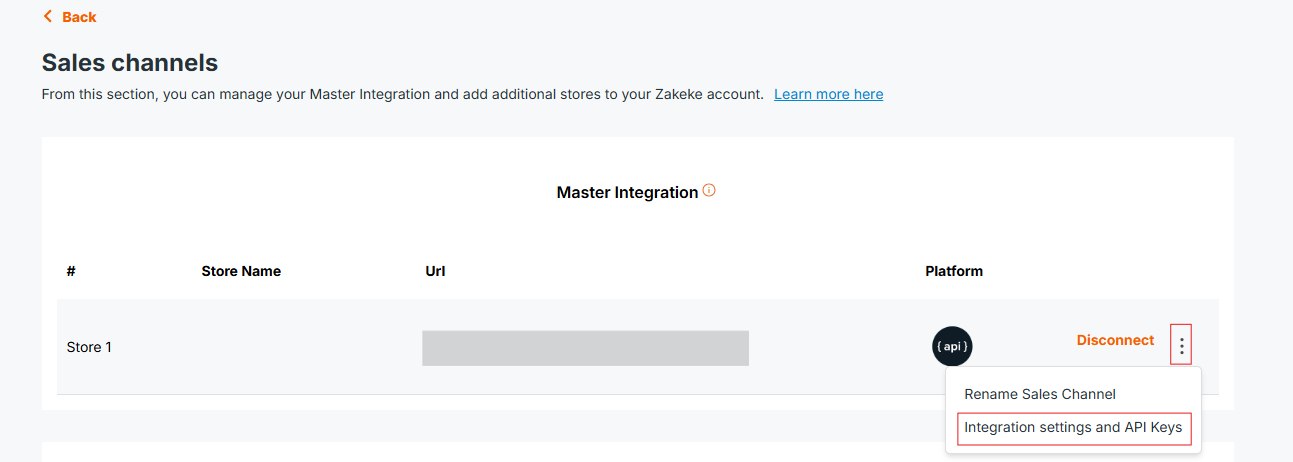
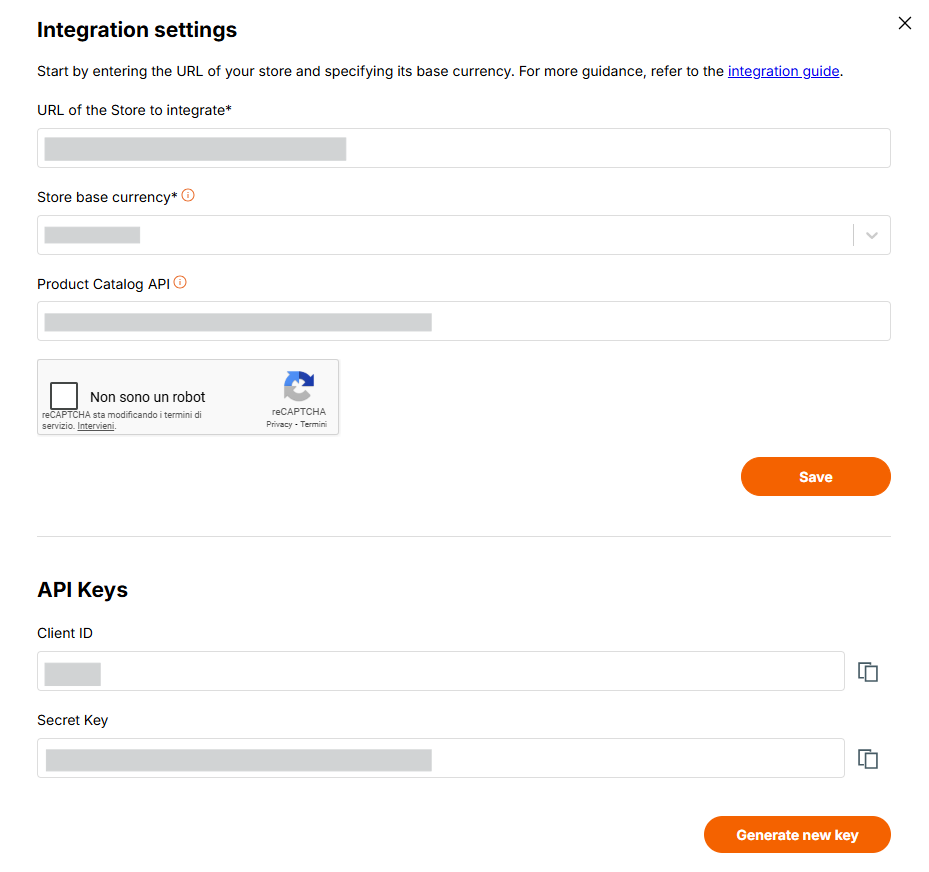
- Select Integration settings and API Keys, then enter the URL of the Store to integrate, the Products Catalog API, and base currency of your system.
2.1 cURL example
Running cURL Commands
cURL commands provided in this guide can be executed on various operating systems, including Windows, macOS, and Linux. Below are the instructions to ensure you can run these commands smoothly on your system.
Prerequisites
Ensure you have cURL installed on your system:
- Windows: Recent versions of Windows 10 and later come with cURL pre-installed. You can check its availability by opening Command Prompt and typing
curl --version. If cURL is not installed, you can download it from the official cURL website or install it via Windows Package Manager (WinGet, Chocolatey, etc.). - macOS and Linux: cURL is typically pre-installed on these operating systems. Verify by opening a Terminal and running
curl --version.
Executing cURL Commands
-
Open your Terminal or Command Prompt:
- On Windows, search for
cmdin the Start menu and open Command Prompt. - On macOS or Linux, open the Terminal application.
- On Windows, search for
-
Run the cURL Command:
- Copy the cURL command exactly as provided in the examples.
- Paste it into your Terminal or Command Prompt window.
- Press Enter to execute the command.
Note on Using cURL
- Ensure you replace placeholder values (e.g.,
<your_client_id>,<your_secret_key>) with actual data relevant to your use case. - For Windows users, if you encounter issues with single quotes (
'), try replacing them with double quotes (") and vice versa.
By following these steps, you should be able to execute cURL commands to interact with APIs as demonstrated in this guide, regardless of your operating system.
Example commands
To get an access token using the "x-www-form-urlencoded" protocol for all the parameters, run this command:
curl -X POST https://api.zakeke.com/token \
     -H "Accept: application/json" \
     -H "Content-Type: application/x-www-form-urlencoded" \
     -d "grant_type=client_credentials&client_id=<your_client_id>&client_secret=<your_client_secret>"
To get an access token using the Basic Auhtentication protocol (recommended), run this command:
curl -X POST https://api.zakeke.com/token \
     -H "Accept: application/json" \
     -H "Content-Type: application/x-www-form-urlencoded" \
     -u "your_client_id:your_secret_key" \
     -d "grant_type=client_credentials"
2.2 Postman example
Below are the steps to use Postman for API calls:
1) Download Postman for your environment, and open Postman.
2) Specify POST for the method and for the URL specify the followin text:
https://api.zakeke.com/token
3) On the Authorization tab, select "Basic Auth" and then enter these information:
| Parameter | Value |
|---|---|
| Username | Your client ID |
| Password | Your secret key |
4) On the Body tab, select "x-www--form--urlencoded" for the format and enter the following key-value pair:
key:   grant_type
value: client_credentials
5) Click Send
6) View the response
2.3 .NET C# example
The following C# code illustrates haw to get the access token using the "x-www-form-urlencoded" protocol to send credentials:
using System;
using System.Net.Http;
using System.Collections.Generic;
using System.Threading.Tasks;

class Program
{
    static async Task Main()
    {
        using (var client = new HttpClient())
        {
            string endpoint = "https://api.zakeke.com/token";

            var requestContent = new FormUrlEncodedContent(new[]
            {
                new KeyValuePair<string, string>("grant_type", "client_credentials"),
                new KeyValuePair<string, string>("client_id", "<your_client_id>"),
                new KeyValuePair<string, string>("client_secret", "<your_secret_key>")
            });

            HttpResponseMessage response = await client.PostAsync(endpoint, requestContent);
            string responseContent = await response.Content.ReadAsStringAsync();
            Console.WriteLine(responseContent);
        }
    }
}
The following code illustrates the use of Basic Authentication protocol (recommended) to send API keys credentials:
using System;
using System.Net.Http;
using System.Net.Http.Headers;
using System.Text;
using System.Threading.Tasks;

class Program
{
    static async Task Main()
    {
        using (var client = new HttpClient())
        {
            string endpoint = "https://api.zakeke.com/token";

            var clientId = "<your_client_id>";
            var clientSecret = "<your_secret_key>";

            var bytes = Encoding.ASCII.GetBytes($"{clientId}:{clientSecret}");

            var credentials = Convert.ToBase64String(bytes);

            client.DefaultRequestHeaders.Authorization =
                new AuthenticationHeaderValue("Basic", credentials);

            var requestContent = new FormUrlEncodedContent(new[]
            {
                new KeyValuePair<string, string>("grant_type", "client_credentials")
            });

            HttpResponseMessage response = await client.PostAsync(endpoint, requestContent);
            string responseContent = await response.Content.ReadAsStringAsync();
            Console.WriteLine(responseContent);
        }
    }
}
Follow these steps to execute the C# code examples on your personal computer:
1) Install .NET SDK. Ensure the .NET SDK is installed on your PC. If it's not already installed, you can download and install it from the official .NET website.
2) Create a Console Application. Open a command prompt or terminal and perform the following steps:
- Navigate to the directory where you want to create your project.
- Create a new console application by running:
dotnet new console -n MyOAuthApp
- Move into the newly created project directory:
cd MyOAuthApp
3) Add the code.
- Open the Program.cs file in your preferred text editor.
- Replace its contents with the C# example code provided in the guide. Make sure to replace any placeholders like
<your_client_id>and<your_secret_key>with your actual API credentials.
4) Run the application. To execute your application, ensure you're still in the project directory in your command prompt or terminal, then run:
dotnet run
2.4 Node.js example
The following JavaScript code illustrates haw to get the access token using the "x-www-form-urlencoded" protocol to send credentials:
const url = 'https://api.zakeke.com/token';
const params = new URLSearchParams();

params.append('grant_type', 'client_credentials');
params.append('client_id', '<your_client_id>');
params.append('client_secret', '<your_client_secret>');

fetch(url, {
    method: 'POST',
    headers: {
        'Accept': 'application/json',
        'Accept-Language': 'en-US',
        'Content-Type': 'application/x-www-form-urlencoded',
    },
    body: params
})
.then(response => response.json())
.then(data => console.log(data))
.catch(error => console.error('Error:', error));
The following code illustrates the use of Basic Authentication protocol (recommended) with Node.js and JavaScript to send API keys credentials:
const url = 'https://api.zakeke.com/token';
const clientId = '<your_client_id>';
const clientSecret = '<your_client_secret>';
const credentials = Buffer.from(`${clientId}:${clientSecret}`).toString('base64');

fetch(url, {
    method: 'POST',
    headers: {
        'Accept': 'application/json',
        'Accept-Language': 'en-US',
        'Content-Type': 'application/x-www-form-urlencoded',
        'Authorization': `Basic ${credentials}`,
    },
    body: 'grant_type=client_credentials'
})
.then(response => response.json())
.then(data => console.log(data))
.catch(error => console.error('Error:', error));
Follow the following steps to execute the code on ypur PC:
1) Install Node.js Ensure Node.js is installed on your computer. If not, download and install it from the official Node.js website.
These examples utilize the native Fetch API, which is available in Node.js from version 18 onwards. Ensure that your system has Node.js version 18 or higher installed. You can check your current Node.js version by running the following command in your terminal:
node -v
2) Setup your project Open a terminal and execute the following steps:
- Navigate to your desired project directory.
- If you haven't already initialized a Node.js project, create one by running:
npm init -y
- Install the node-fetch package, which is required to make HTTP requests:
npm install node-fetch
3) Prepare the code
- Create a new file named index.js (or another name of your choosing) in your project directory.
- Open this file in a text editor and insert the Node.js example code provided in the guide. Ensure you replace placeholders like
<your_client_id>and<your_secret_key>with the actual values provided by your API service.
4) Execute the script With your terminal still open in your project directory, run the script using Node.js:
node index.js
This command executes the script, making the API request as specified in your code. Ensure your computer is connected to the internet to allow the script to successfully send and receive data from the API.
3. Access Token for S2S Requests
For Server to Server (S2S) requests to the various endpoints the authorization OAuth token must be of type S2S.
The way to get an authentication OAuth token S2S is the same as normal request except that, in addition of OAuth credential, you must sent the parameter access_type set on S2S mode:
3.1 cURL example
From the command line, run this command:
curl -X POST https://api.zakeke.com/token \
     -H "Accept: application/json" \
     -H "Content-Type: application/x-www-form-urlencoded" \
     -u "your_client_id:your_secret_key" \
     -d "grant_type=client_credentials" \
     -d "access_type=S2S"
4. Customer code and Visitor code into Access Token
Some endpoints (es. such as order checkout on Zakeke: https://api.version.com/v2/order) require an autentication token with, in addition to your OAuth credentials, the identifier of the visitor user or the user who logged in.
One or both of the following parameters must be passed in the body of the request to obtain the token:
| Parameter | Description |
|---|---|
visitorcode | Identifier of visitor who is browsing on your store. |
customercode | Identifier of user who is logged on your store. |
Let's better explain the difference between visitorcode and customercode and why they are necessary. The visitorcode is an alphanumeric code that can uniquely identify an unauthenticated user (i.e. one who has not logged in) on the ecommerce site. The customercode, on the other hand, is an alphanumeric code that uniquely identifies a user who is registered in the e-commerce site and has logged in. Zakeke uses these identifiers to assign ownership of uploaded or user-generated assets. For example, when a user uploads an image, that image will be marked as owned by the user by assigning the visitorcode or customercode and allowing it to be found among their uploaded images in subsequent accesses to customization. Or, when a user saves a customization (design) for future use, that design will be marked as owned by the user. Again, when an order is registered, the order must be assigned to a visitor or customer.
4.1 cURL example
From the command line, run this command:
curl -X POST https://api.zakeke.com/token \
     -H "Accept: application/json" \
     -H "Content-Type: application/x-www-form-urlencoded" \
     -u "your_client_id:your_secret_key" \
     -d "grant_type=client_credentials" \
     -d "access_type=S2S" \
     -d "visitorcode=<VISITOR_CODE>" \
     -d "customercode=<CUSTOMER_CODE>"
4.2 .NET c# example
The following c# code illustrates how to obtain an authorization token of type S2S with a visitorcode:
using System;
using System.Net.Http;
using System.Net.Http.Headers;
using System.Text;
using System.Threading.Tasks;

class Program
{
    static async Task Main()
    {
        using (var client = new HttpClient())
        {
            string endpoint = "https://api.zakeke.com/token";

            var clientId = "<your_client_id>";
            var clientSecret = "<your_secret_key>";

            var bytes = Encoding.ASCII.GetBytes($"{clientId}:{clientSecret}");

            var credentials = Convert.ToBase64String(bytes);

            client.DefaultRequestHeaders.Authorization =
                new AuthenticationHeaderValue("Basic", credentials);

            var requestContent = new FormUrlEncodedContent(new[]
            {
                new KeyValuePair<string, string>("grant_type", "client_credentials"),
                new KeyValuePair<string, string>("access_type", "S2S"),
                new KeyValuePair<string, string>("visitorcode", "<visitor_code>")
            });

            HttpResponseMessage response = await client.PostAsync(endpoint, requestContent);
            string responseContent = await response.Content.ReadAsStringAsync();
            Console.WriteLine(responseContent);
        }
    }
}
4.3 Node.js example
The following JavaScript code illustrates how to obtain an authorization token of type S2S with a customercode:
const url = 'https://api.zakeke.com/token';
const clientId = '<your_client_id>';
const clientSecret = '<your_client_secret>';
const credentials = Buffer.from(`${clientId}:${clientSecret}`).toString('base64');

const params = new URLSearchParams();

params.append('grant_type', 'client_credentials');
params.append('access_type', 'S2S');
params.append('customercode', '<customer_code>');

fetch(url, {
    method: 'POST',
    headers: {
        'Accept': 'application/json',
        'Accept-Language': 'en-US',
        'Content-Type': 'application/x-www-form-urlencoded',
        'Authorization': `Basic ${credentials}`
    },
    body: params
})
.then(response => response.json())
.then(data => console.log(data))
.catch(error => console.error('Error:', error));