CSV Import API (legacy)
This page documents the legacy CSV format (products.txt / sides.txt / areas.txt, endpoint /v2/csv/import). It is kept for backward compatibility only.
For new integrations use the current CSV Import API (v3), which supports the full canonical catalog (products, variants, sides, print areas, printing methods, sales channels, resizable products, translations and deletions).
Summary
-
First Step: Upload the CSV Zip File
2.1 Endpoint
2.2 Authentication
2.3 Parameters
2.4 Output
2.5 HTTP Response Codes -
Second Step: Check The Import Status
3.1 Endpoint
3.2 Parameters
3.3 Output
3.4 HTTP Response Codes -
Guidelines for CSV Import
5.1 Product Data Specification
5.2 Sides Data Specification
5.3 Areas Data Specification
1. Overview
The CSV Import API allows you to massively import customizable products into the Zakeke system. The API allows you to pass a series of files in the CSV (comma separated values) format with the data necessary to activate the personalization of the specified products with Zakeke.
The import operation consists of two steps:
-
The first step allows you to upload the CSV files and start an asynchronous process that imports (creates or modifies) the specified customizable products into Zakeke.
-
In the second step, you can check the status of the ongoing import process.
For each of these steps, there is a dedicated API endpoint. One endpoint for uploading the zip file containing all the required CSV files to kickstart the import process, and a second endpoint allows to check the operation status.
If the Product Catalog API is active, the variants specified in the CSV must exactly match the products in the Product Catalog API. Otherwise, conflicts may occur, preventing proper variant management.
2. First Step: Upload the CSV Zip File
The first step starts a background task responsible for importing the products into the system. This API call returns a TaskID along with a potential error. The TaskID can be considered as a "take charge" number through which it is possible to request the status of the operation with the second endpoint.
2.1 Endpoint
POST https://api.zakeke.com/v2/csv/import
2.2 Authentication
As with all API calls to Zakeke, the call for uploading CSV files also requires authentication and authorization. CSV endpoint must be called in S2S (server to server) mode and requires a Server to Server authorization token. For further information see how to get a S2S OAuth token
2.3 Parameters
The API call uses the multipart/form-data encoding type to upload the file. When interacting with web APIs that require file uploads, such as images or documents, the multipart/form-data method is often used. This encoding type is designed for efficiently uploading files as it allows you to send files as binary data along with other form data in a single HTTP request. It's particularly useful for APIs that accept file uploads, as it supports sending files and data of different types in separate "parts" of the same request.
The endpoint allows you to upload a ZIP archive file that contains all the CSV files and starts the related asyncronous task. The Content-Type header of the request must be setted to multipart/form-data and the body of the request must contains the bytes of the file.
cURL example
Below is an example of a cURL command for uploading the ZIP file containing the CSV files:
curl -X POST https://api.zakeke.com/v2/csv/import \
 -H Accept: "application/json" \
 -H Authorization: "Bearer <Access-Token>" \
 -H Content-Type: "multipart/form-data" \
 -F data="@c:/user/data/CSV.zip"
.NET c# example
The following is an example of c# code for uploading the ZIP file:
using System;
using System.Net.Http;
using System.IO;
using System.Threading.Tasks;
using System.Text.Json; // Include System.Text.Json for JSON deserialization

class Program
{
    static async Task Main(string[] args)
    {
        var url = "https://api.zakeke.com/v2/csv/import";
        var filePath = @"path/to/yourfile.zip"; // Replace with your file path
        var bearerToken = "your_bearer_token_here"; // Replace with your bearer token

        try
        {
            using (var client = new HttpClient())
            {
                client.DefaultRequestHeaders.Authorization =
                    new System.Net.Http.Headers.AuthenticationHeaderValue("Bearer", bearerToken);

                using (var content = new MultipartFormDataContent())
                {
                    var fileContent = new ByteArrayContent(File.ReadAllBytes(filePath));
                    fileContent.Headers.ContentType =
                        new System.Net.Http.Headers.MediaTypeHeaderValue("application/zip");

                    content.Add(fileContent, "file", Path.GetFileName(filePath));

                    var response = await client.PostAsync(url, content);

                    if (response.IsSuccessStatusCode)
                    {
                        var responseContent = await response.Content.ReadAsStringAsync();

                        // Deserialize the JSON response to a C# object
                        var responseObject =
                            JsonSerializer.Deserialize<ResponseObject>(responseContent);

                        if (responseObject != null)
                        {
                          if (string.IsNullOrEmpty(responseObject.LastError))
                          {
                              Console.WriteLine("File uploaded successfully. " +
                                  $"TaskID: {responseObject.TaskID}");
                          }
                          else
                          {
                              Console.WriteLine("File uploaded but the server " +
                                  $"returned an error. Error: {responseObject.LastError}");
                          }
                        }
                    }
                    else
                    {
                        Console.WriteLine("Failed to upload file. "+
                            $"Status code: {response.StatusCode}");
                    }
                }
            }
        }
        catch (Exception ex)
        {
            Console.WriteLine($"An error occurred: {ex.Message}");
        }
    }
}

// Define a class to match the JSON response structure
public class ResponseObject
{
    public int TaskID { get; set; }
    public string LastError { get; set; }
}
2.4 Output
The output of the call is a structure (in JSON format) with the following properties:
| Property | Data type | Description |
|---|---|---|
| TaskID | integer | Task Identifier required for retrieving related results by importingresult endpoint. (Explained below) |
| LastError | string | Description of error occurred while creating task, if any |
What follows is an example of the output in JSON format:
{
 "TaskID": 123654,
 "LastError": ""
}
2.5 HTTP Response Codes
| Code | Description |
|---|---|
| 200 | The CSV importing task successfully created. See response body if there are errors. |
| 415 | Unable to create the CSV importing task (e.g. ZIP archive is not valid) |
3. Second Step: Check The Import Status
This step utilize the TaskID obtained from the first endpoint to monitor the status of the importing task.
1.6 Endpoint
GET https://api.zakeke.com/v2/csv/importingresult/{taskid}
3.2 Parameters
The method accepts the TaskID related to the CSV file import task started via the appropriate endpoint.
3.3 Output
The output of the request is a structure that reports the list of any errors that occurred during the upload and the list of the unique identifiers of the products that Zakeke imported successfully. The output has the following properties:
| Property name | Data type | Description |
|---|---|---|
errorOccurred | Boolean | Indicates if there are errors. |
errors | Array | The list of errors. |
importedProducts | Array | The list of imported products. |
Each error in the errors list will have the following properties:
| Property name | Data type | Description |
|---|---|---|
row | Integer | CSV row number where error occurred. |
description | String | Error description. |
sourceFile | String | Full name of CSV file with the error. |
Each product in the importedProducts list will have the following properties:
| Property name | Data type | Description |
|---|---|---|
productId | Integer | Unique identifier of the product created in Zakeke. |
hasConfiguredArea | Boolean | Indicates whether a print area has been configured for the product. |
What follows is an example of the resulting JSON object:
{
  "errorOccurred": true,
  "errors": [
    {
      "row": 0,
      "description": "Areas in side Back are present but no PPCM defined or it is not greater than 0",
      "sourceFile": "Products.csv"
    }
  ],
  "importedProducts": [
    {
      "productId": 234252,
      "hasConfiguredArea": true
    },
    {
      "productId": 234253,
      "hasConfiguredArea": true
    },
    {
      "productId": 234254,
      "hasConfiguredArea": true
    }
  ]
}
3.4 HTTP Response Codes
| Code | Description |
|---|---|
| 200 | CSV importing successfully completed. See response body if there are errors. |
| 204 | Task results is not available. |
| 404 | Unable to get CSV Task results: taskid was not found or is not valid. |
4. API Reference
For API technical reference go to API-Reference
5. Guidelines for CSV Import
You can import a set of CSV files with our API to import multiple customizable products at once. It is possible to use this function both to add and to update products.
At the end of the CSV import, you will need to configure the "pricing" for your products.
File to send must be a ZIP archive with the following CSV files (in .txt extension, with a CSV content). Click here to download a sample ZIP file with products and customizable areas.
| File name | Description | |
|---|---|---|
| products.txt | Customizable products Go to CSV product data specification. | Required |
| sides.txt | List of sides for product Go to CSV sides data specification. N.B. It is not possible to send sides for products not present in the products CSV | Required |
| areas.txt | List of customizable print areas for product Go to CSV areas data specification. N.B. It is not possible to send print areas for products not present in the products CSV. | Required |
2.1 Product Data Specification
The product data you send using these attributes are the basis for creating your templates to be customized with Zakeke.
Products and Variants
The file allows you to upload data for both the products and their variants. If a product in the store has multiple variants (colour, size, etc.), the file must contain a line for each product variant that you want to make customizable and, in this case, the contents of all the fields relating to the product (ID , name, etc.) will be repeated for all variant lines. In the case of a product without variants, each row will instead relate to a product.
It is important to note that, in the context of CSV, we are specifically referring to customizable product variants rather than general product variants. For example, suppose that an e-commerce site sells a t-shirt in two size versions (S and M) and two color versions (Red and Yellow). Two attributes will be defined on the ecommerce site, Size and Color, each with two values (S and M for Size and Red and Yellow for Color). There will be a total of 4 product variants, one for each combination of the values of the two attributes: (S, Red), (S, Yellow), (M, Red) and (M, Yellow). Let's suppose that the only relevant aspect for customization is the color, because for example it is not necessary to define a different print area for different sizes. In this case it will be sufficient to specify only the color variants (Yellow and Red) in the CSV. In the other case, if in addition to the colour, it makes sense to distinguish the customization also for a specific size, all 4 combinations listed above should be entered in the CSV and we will have 4 rows.
The product CSV file includes an Attributes field that allows you to specify for each customizable variant the list of key-value pairs for the attributes that distinguish the particular customizable variant, in the format
<attributeKey1>=<value1>,...,<attributeKeyN>=<valueN>.
In the example of size and color, let's assume that in the store the size attribute has the key Size and values S and M and that the color attribute has the key Color and values (Red and Yellow). If the customizable variants are only the color ones, in the CSV we will have two rows, one in which the Attributes field will contain Color=Red and another in which the Attributes field will contain Color=Yellow. If the customizable variants are both color and size, in the CSV we will have 4 lines, in which the Attributes field will contain "Size=S,Color=Red", "Size=S,Color=Yellow", "Size=M,Color=Red", "Size=M,Color= Yellow" respectively.
In the integration on product page part it is explained how the content of the Attributes CSV field passed for a customizable variant will become a part of the complete selection of attributes that will identify a purchasable variant of the product. Continuing with the previous example of customizable color-only variants, if the user customizes the variant with Color=Red, to identify the purchasable variant of the ecommerce we will also have to add the selection of the size attribute (e.g. Size=M) that the user will have performed on the product page.
Attributes that must be specified in the CSV
| Attribute | Format | Minimum requirements |
|---|---|---|
| MasterProductID | Mandatory Unique identifier of the product in the store. Syntax Maximum 100 characters Example 100A | - Use a unique value for each product. If possible, use the SKU of the product. - In the case of a product with variants, this ID will be repeated for each row representing the variant. - Keep the same value when updating product data - Use only valid Unicode characters. Avoid invalid characters such as control, function or private area characters |
| ProductID | Mandatory Unique identifier of the product variant Syntax Maximum 100 characters Example 100A-BL | - Use a unique value for each variant. - If a product has no variants, use the same product identifier specified in the MasterProductID field - This identifier is only used internally during the CSV import process and is never exposed or used outside of the CSV import operation - Use only valid Unicode characters. Avoid invalid characters such as control, function or private area characters |
| ProductName | Mandatory Product name Syntax Maximum 400 characters Value must be enclosed with quotes Example "Customizable t-shirt" | Carefully describe the product so that it matches the title on your target page. |
| ImageLink | Mandatory The URL of the main image of your product Example http://your.store.com/product-image.jpg | 1. For the image URL: - Insert the link to the main product image - Starts with http or https - Use a coded URL in compliance with RFC 2396 or RFC 1738. For example, a comma is coded in "%2C" 2. For the image: - Use an accepted format: non-animated (.gif), JPEG (.jpg/.jpeg), PNG (.png) - Do not enlarge the image or send thumbnails - Do not include promotional text, watermarks or borders |
| VariantName | Mandatory for product variants Name of product variant applicable for customization localized in your ecommerce language Syntax Maximum 400 characters Value must be enclosed with quotes Example"Red" | - Carefully describe the variant by specifying all the attributes that distinguish it, such as colour - Name must be in your e-commerce default language (english in the example) |
| VariantNameLocale | Optional (applicable for products with variants) List of pairs formed by culture and respective localized variant name Syntax Pairs are formed by culture and localized text seperated from colon character; they are separated from pipe character and culture must be coded according Microsoft Language Culture Names. Click here for more details about language culture names. Value must be enclosed with quotes Example "it-IT:Rosso/fr-FR:Rouge" | - Use only valid unicode characters - Variant name in your e-commerce default language, must be excluded |
| Attributes | Mandatory The list of key-value pairs that identifies the customizable variant of the product. Syntax <attributeKey1>=<value1>,...,<attributeKeyN>=<valueN> where each attributeKey is a key or name that identifies the attribute and value is the respective coded value. The field value must be enclosed with quotes Example "color=1" | The defined keys and values will be the reference for the integration scripts used in the product page of your e-commerce. Go to integration on product page for more details |
2.3 Sides Data Specification
Sides data, that you send with these attributes, are the basis for creating the customizable sides of your products.
Attributes that must be specified in the CSV
| Attribute | Format | Minimum requirements |
|---|---|---|
| MasterProductID | Mandatory Unique identifier of the product in the store. Syntax Maximum 100 characters Example 100A | - Coincides with the MasterProductID specified for a product in the products.txt file. - Keep the same value when updating product data Use only valid Unicode characters |
| VariantName | Mandatory Name of the customizable product variant Syntax Maximum 400 characters Value must be enclosed with quotes Example "Red" | - Carefully describe the variant by specifying all the attributes that distinguish it - Name must be in your e-commerce default language (english in the example) |
| SideName | Mandatory Name of product side Syntax Maximum 100 characters Value must be enclosed with quotes Example "Front" | Name must be in your e-commerce default language (english in the example) |
| SideNameLocale | Optional List of pairs formed by culture and respective localized side name Syntax Pairs are formed by culture and localized text seperated from colon character; they are separated from pipe character and culture must be coded according Microsoft Language Culture Names. Click here for more details about language culture names. Value must be enclosed with quotes Example "it-IT:Fronte / fr-FR:Avant" | - Use only valid unicode characters - Side name in your e-commerce default language, must be excluded |
| SideCode | Optional Code to be used to identify a side Syntax Maximum 50 characters Example front | Use only valid unicode characters |
| UrlImageSide | Mandatory URL of product side image that includes the reference customizable area Example http://your.store.com/product-image-frontside.jpg | 1. For the image URL: - Starts with http or https - Use a coded URL in compliance with RFC 2396 or RFC 1738. For example, a comma is coded in "%2C" 2. For the image: - Use an accepted format: non-animated (.gif), JPEG (.jpg/.jpeg), PNG (.png) - Do not enlarge the image or send thumbnails - Do not include promotional text, watermarks or borders |
| PPCM | Optional The number of pixels per cm in the side image. The PPCM (pixels per centimeter) represent a way to specify the physical dimensions of what is depicted in the image, as well as the printing areas that will be defined for this side of the product. It can be calculated using both the distance in pixels and centimeters between any two points in the image. If the distance in cm that separates two points in the image is known, the PPCMs are obtained by dividing the number of pixels that separates these points by this known distance in cm. NB: PPCM becomes mandatory if you want to upload the areas CSV too. Syntax Positive decimal number Example 19.04 |
2.4 Areas Data Specification
Customizable areas data, that you send with these attributes, are the basis for creating customizable print areas applicable to your customizable products.
Define print area with mask image
To create print areas using CSV data, Zakeke uses a mask image in which the print areas are simply represented by black pixels and everything else is transparent. The images below show how to create the mask image for two products, a t-shirt and a phone case. On the left are the print areas you want to obtain, in the center the image of the side loaded for the product using the sides.txt file and on the right the mask image to be used for this CSV of the areas.
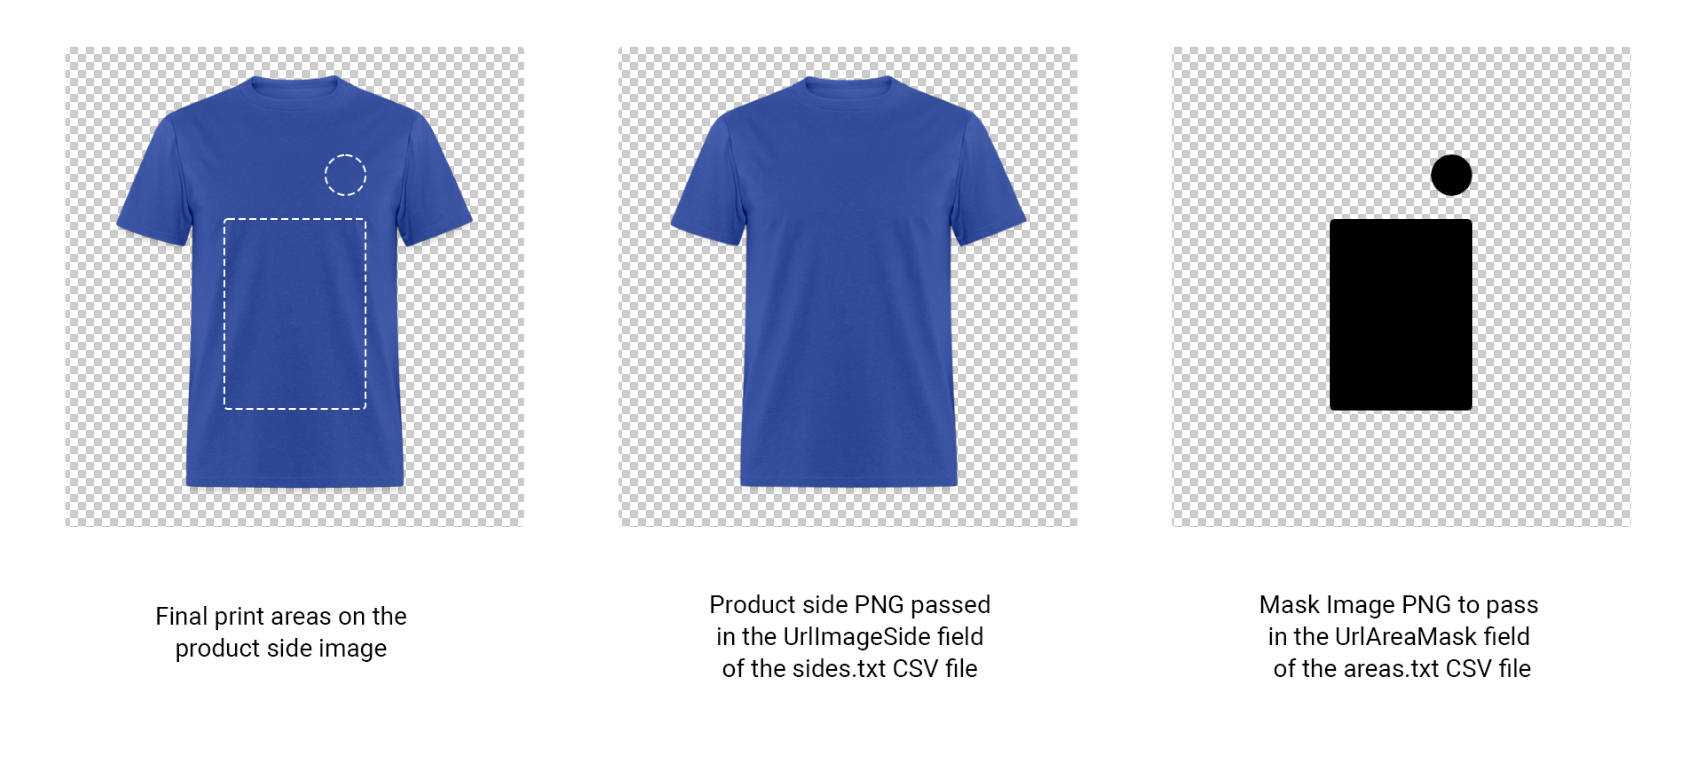
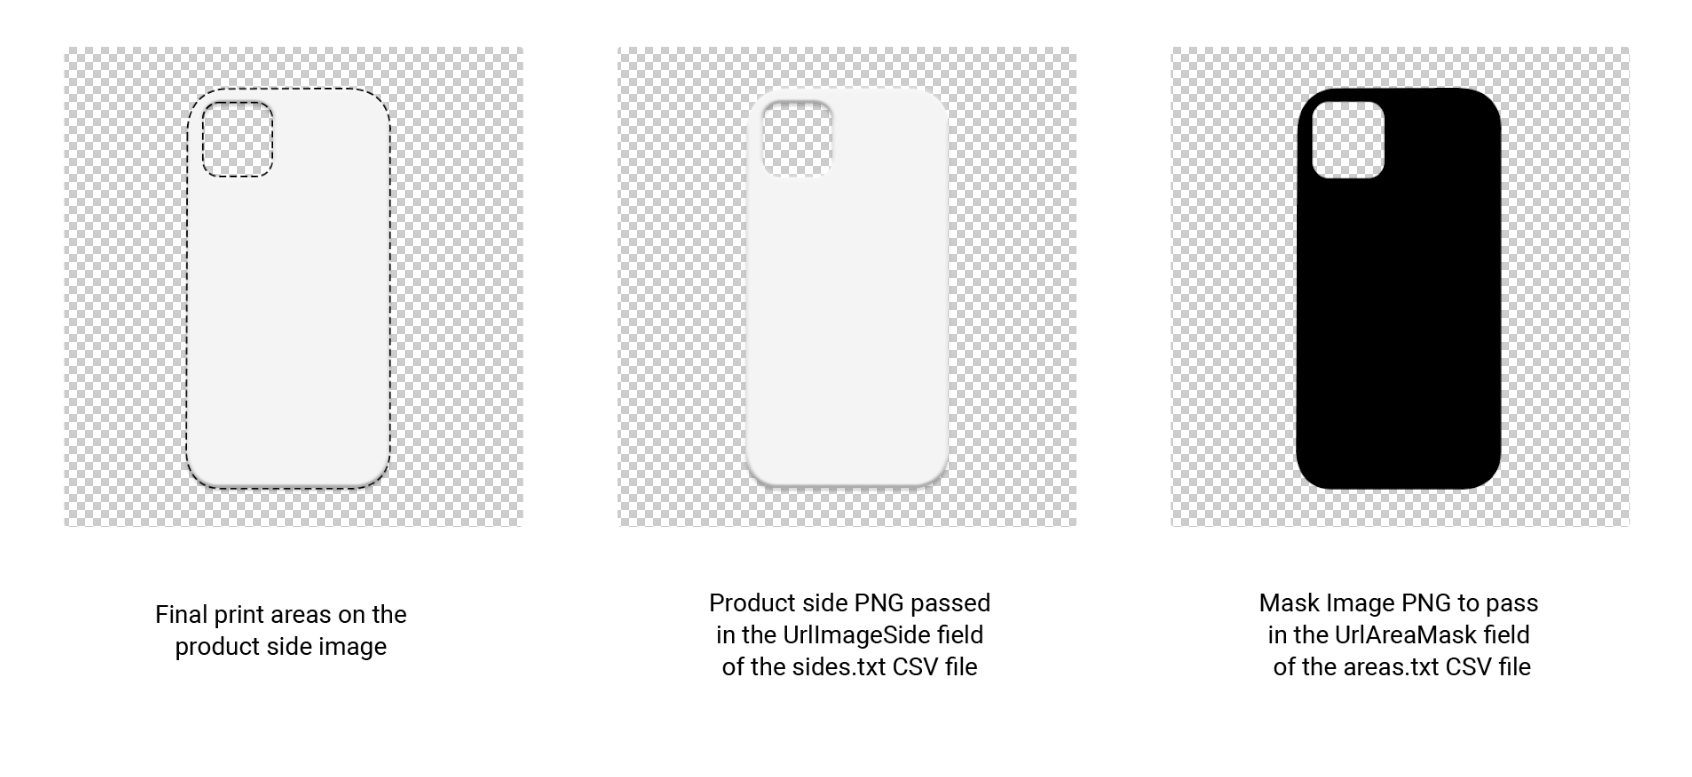
The mask image and the product side image must necessarily have the same size in pixels. Additionally, the mask image must have a transparent background and must have a transparent border of at least one pixel.
Attributes that must be specified in the CSV
| Attribute | Format | Minimum requirements |
|---|---|---|
| MasterProductID | Mandatory Unique identifier of the product in the store. Syntax Maximum 100 characters Example 100A | - Coincides with the MasterProductID specified for a product in the products.txt file. - Keep the same value when updating product data - Use only valid Unicode characters |
| VariantName | Mandatory Name of the customizable product variant Syntax Maximum 400 characters Value must be enclosed with quotes Example "Red" | - Carefully describe the variant by specifying all the attributes that distinguish it - Name must be in your e-commerce default language (english in the example) |
| SideName | Mandatory Name of product side Syntax Maximum 100 characters Value must be enclosed with quotes Example "Front" | Name must be in your e-commerce default language (english in the example) |
| AreaName | Optional Name of product customizable area Syntax Maximum 100 characters Value must be enclosed with quotes Example "Front area" | |
| UrlAreaMask | Mandatory URL of mask image that defines the shape of the customizable area Example http://your.store.com/product-image-frontside-area1-mask.png | 1. For the image URL: - Starts with http or https - Use a coded URL in compliance with RFC 2396 or RFC 1738. For example, a comma is coded in "%2C" 2. For the image: - Use PNG (.png) - Place one or more black shapes were you want to let the user add texts or images - The black shapes should be completely black (even inside) - The image background must be transparent 2.5 The image must have a transparent border wide at least 1 pixel - You can download an example mask image (there are three areas, both simple and complex ones) |
| ClipOut | Optional Indicates whether images and texts in the output files should be cropped to the shape of the area or should be at least wide at tall as the area outer bounds (this can lead to output images bigger than the area shape). Syntax Boolean value "true" or "false" Default value true | true: produces cropped out output files false: produces output files which have the maximum length and height of the area (they could be bigger than the area shape) |